 Tweet
Tweet
Originally posted by Alxj64
View Post
-
When it comes time to put wipers on my M37. i was going to go out to the pick and pull and start popping open hatchbacks, the problem with most modern windshield wiper setups is they use wiper arms and blades that are way too long for our old school flat glass windows....but there has been a lot of vehicles made with real nice compact REAR window wiper setups, nice short wiper arms. modern blades and compact motors. -
Working on all sorts of stuff
Lots going on but the progress is far from dramatic.
I just spent 3 hours researching suspension seats. Man are those suckers expensive. I looked at Mastercraft, PRP, Twisted stitch, Beard and Smittybuilt . The Smittybuilt and Beard are eliminated for a variety of reasons, the remaining ones are way expensive once you add heat. I need something I can sit in for hours and it will not beat me to death.
off to bed.
BruceComment
-
Biggest downsides to rear wiper setups:Originally posted by Chris Olson View Post- They are only designed to mount the way they were in the vehicle, which means they might work well on one side of the cab but not the other.
- Finding the right sweep can be tricky, it's either a linkage which means you're not going to fit it like the stock setup, or it's built into the transmission on the motor which means it can't be easily changed if it's too wide or too narrow.
- They are designed for one speed, you will get low speed, and with the right switch will also get intermittent as most have a park position, but you won't get a high speed. Probably not a deal breaker on a stock truck, but on a modified vehicle capable of normal highway speeds it could be an issue.
Comment
-
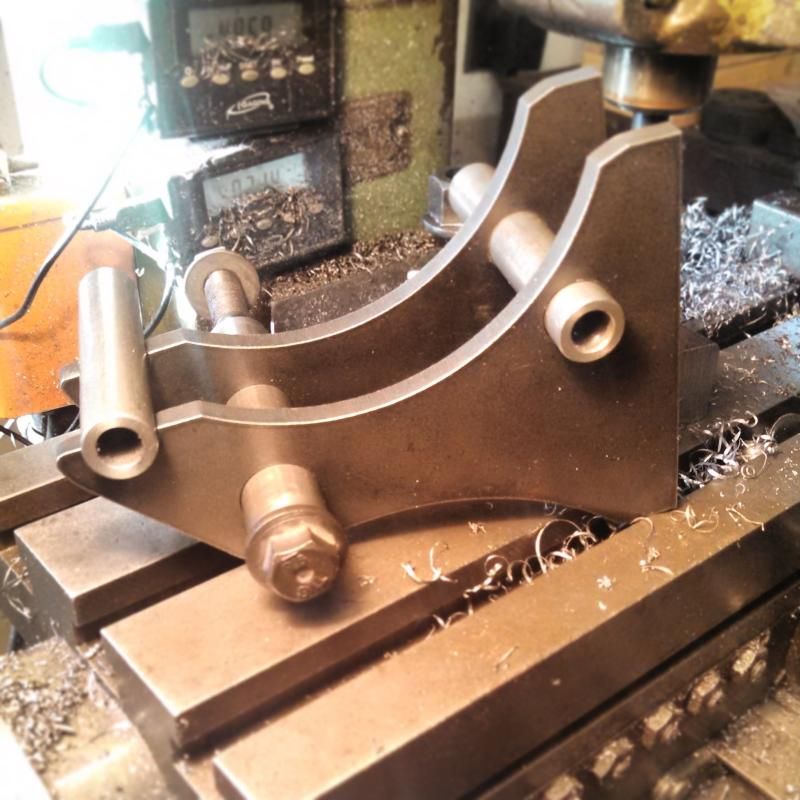
Another part gets attached to the cab
I installed the upper lift gate today . I ended up adding bushings to the outer parts of the lift gate hinges. My old pins fit fine but were worn out. The new pins from Roberts and from VPW are smaller than mine. My pin diameter is .280 Roberts and VPW pin diameter is .275.
The gate did not fit in the frame square so I made an adjustment with a jack.
The door sat about 3/8 proud of the frame , my solution was to put a 4x4 in place and press on the door. I managed to straighten it out to about 1/8 maybe a tad smaller. To do so the door was pressed in over 4 inches. If the glass was not in the door I would have gone at it until it fit perfectly , but I think the glass was about to explode. So uncharacteristically I quit while the going was good.
That tailgate was stripped to bare metal and then repainted to match the old paint on the truck�.. some people are so dumb. The brown primer will get cleaned up at some point. The original hinge bolts were straight or slotted style, I had to drill a few out. The new ones are allen or socket head. I think they look better and are certainly easier to tighten.Comment
-
Looking good!
Bruce! The truck is looking good man! I am envious of your progress! I've been trying to get a bunch of day job stuff done so that I can take some time off around the holidays to crank out some progress on my truck; and I'm with you I spend more time researching and searching for information than I do actually wrenching on the truck. I've actually been trying to get dimensions for my AC compressor because I ordered one from Vintage air and its drop ship date keeps getting pushed back and pushed back and pushed back and I really need it so that I can setup my serpentine routing and make sure I leave room for the 11 million things that have to go up front in this truck. Most of my radiator parts are here.
In regards to your seats, I really like the Mastercrafts in my Jeep. I picked them up surplus out of some Oshkosh 5 ton trucks that were built for R&D. I don't think there are anymore avail from my source but they came with sliders and belts. You can still get them from MC last I checked. Mounting is really easy. Stout seat, however they do UV fade unless you coat them with their spray stuff. My plans for my seat is to re-create a bench type split setup up front that will slide and the back will adjust. I have it designed, just need to bend up the material and order my linkages... its actually my hold up on finishing the firewall and stuff on the driver's side since I want seat placement so I can get wheel placement and pedal placement all comfortable.
Anyone near OKC? Here is a pile of those R16 Hutchinson wheels. You could totally snag these and have an adapter made to run them on the BUDD lug pattern that then bolts into these wheel centers.
http://www.govliquidation.com/auctio...&convertTo=USD1942 WC53 Carryall in progress.Comment
-
Hutchinson's
Alex, What is the lug pattern on those wheels? I'm using the new metric Ford pattern.
Also would you sell the CAD drawings of the frame boxing you did, or what would you charge to cut out a set? I dont have access to a CNC machine, and trying not to have to reinvent the wheel.Comment
-
Hydro boost install #3
Rebuilt the leaky hydro boost that was in the Carryall and pulled the faulty one out of the truck. This means that I am going for round three and suspect that I am looking at round four. The area that was leaking into the cab had a few pits in it. In the rebuild kit it states that certain units are not rebuildable- of course the other two spare units in the shop turned out to be the non rebuildable type. Rebuilding is not a pleasant job. There are a few little wire clips that are real annoying and frustrating to get at. It took about four hours to get it apart , rebuilt and installed. I now have brakes and a drop of oil at the end of the hydro boost where it was leaking in the past. I will wait for a few days and see if it stops but I doubt that will be the case.
Next thing to do is install the tires , roll the truck back a foot and see if I get get one of the XZLs installed. I need to set my steering stops and then pull the ram out and come up with a method of adjusting the stroke.
Of interest- found this in a Dana 60 manual
Caster is 2-4 degrees positive with power steering, anything more may create a shimmy. Caster is adjusted using shims��..but the owner must follow the vehicle manufactures specs.
Toe in = 1/16
Going to get cold and dirty playing in the bush tomorrow
WAY FUN
speaking of seats ,look at these babies
http://www.govliquidation.com/auctio...&convertTo=USD
and these look like they were made in 1942
http://www.govliquidation.com/auctio...&convertTo=USDComment
-
Bruce, for a limit in the cylinder, I have turned down some Delrin plastic bushings to use as internal stops for the cylinder and timed them with the knuckle stops. I've also heard that about the caster issue on the Dana 60 front axles. The camber inclination of the king pins causes funny caster changes quickly with the slightest turn of the wheel. If you end up with a bumpsteer issue then it quickly turns into a shimmy or wobble.. then multiply that times the fact that your inclination angle is now on a taller tire radius so then you can actually get away with even slightly lighter caster angle because the affects are greater. Lots of big road tractors have only a half a degree or so of caster from what I have noticed.
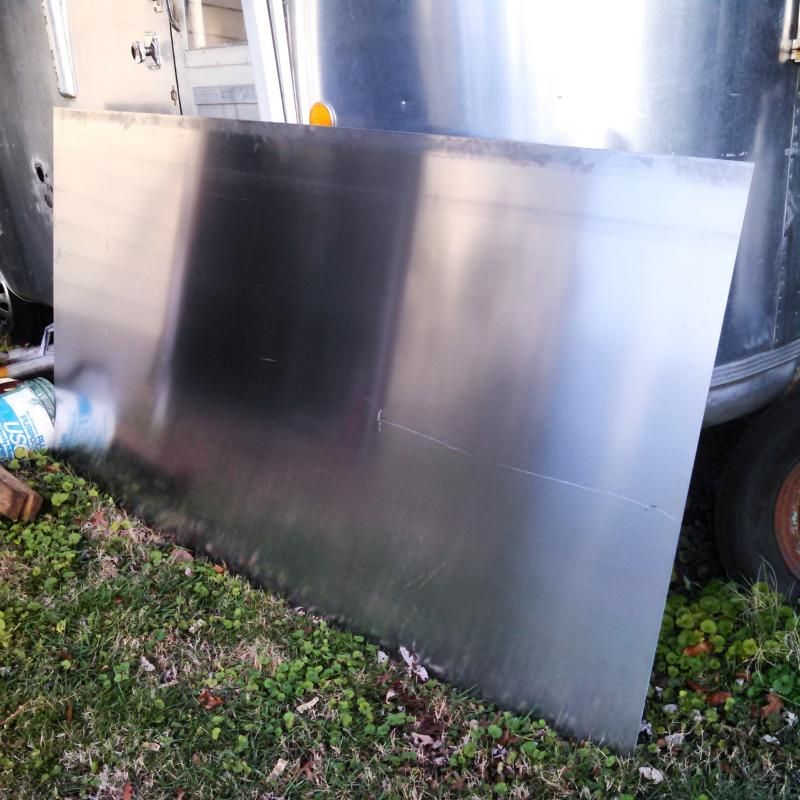
And picked up a sheet of .080" 5052 AL yesterday so that I can start on the cooling system stuff over the weekend...
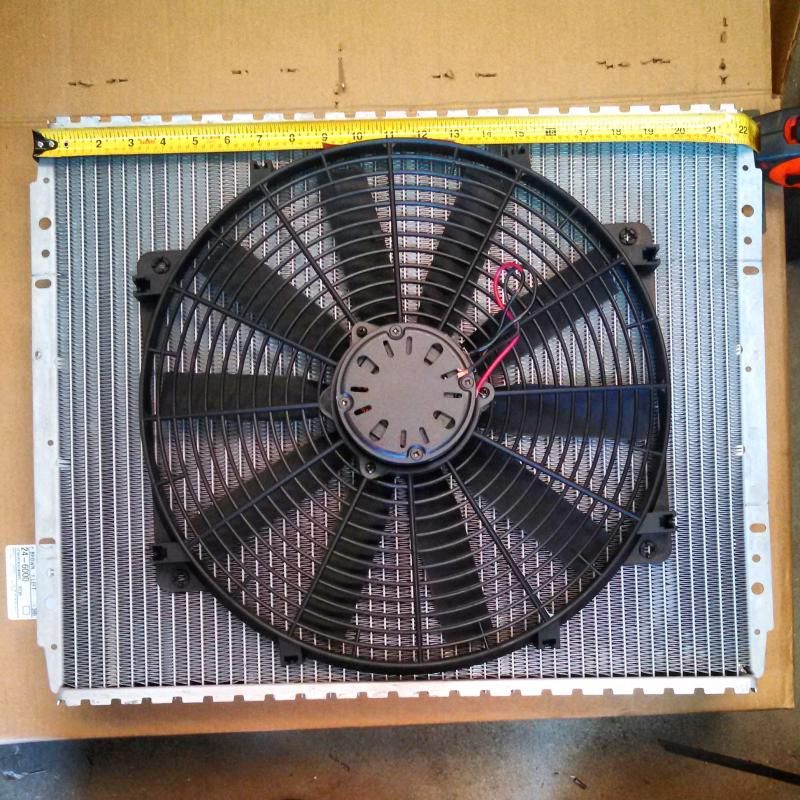
This is a HOWE Racing radiator core. 22.5" x 17" x 3". Its the extruded tube type as well, supposedly is one of the most efficient core designs in the industry right now. I am going to add my own tanks and filler location to stuff as much into this truck cowl as possible. AC condensor gets here around Christmas.. My intercooler core from Vibrant is STILL on back order. Already a month late from original delivery est. The E-fan is a Flexi-lite Slim Boy or something like that, 16" dia and supposed to move 2500 CFM. I'm going to build a nice but shallow shroud for it to mount to. The fan motor should sit just above the crank pulley but its all still going to be a tight fit with this motor. I plan on leaning the whole thing back a little bit to help fit the intercooler in the top of the cowl and then have the AC condensor mount vertically.
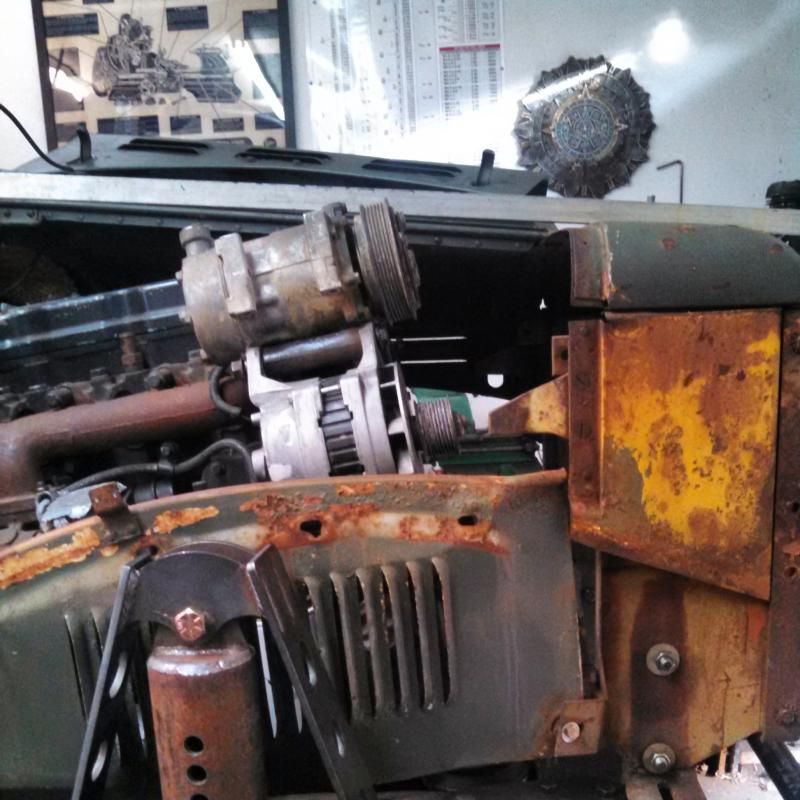
Also, the alternator bracket that came with the engine just doesn't quite work... dropping the whole assembly down 2" should give me enough room to stack the AC compressor above it all on one bracket. The ECM takes up a ton of room on the driver's side, plus I was going to leave myself room for surge tanks, PS fluid reservoir, etc all over there. Too much stuff to pack into a small area. Kinda glad I decided to move the engine back some and just redo the banged up firewall... had to regardless because of Allison girth.
 1942 WC53 Carryall in progress.
Comment
-
Tossed a tire on the front
"tossed" may not be the correct term. First I installed all the mini tires, then I rolled the truck back on the hoist until it was about 6 inches away from the mezzanine, then I gingerly raised the truck and locked it in place. After that I pulled off the front roller and man handled the XZL into position. All this to see if there was room to adjust the stops on the dana 60. The quick answer is "NO," any more adjustment and the tires will rub.
Next step is to remove the ram, dismantle the thing, and maybe bug Alex about how he secured the bushing in his ram in place.
Darn those tires look great in that wheel opening.Comment
-
Delrin plastic bushings how do they work?
Man I need a frigging lathe. Limiting the ram stroke is easy in theory, but without access to a lathe I am forced to go to a machinist and then wait - like until the end of holidays.
So how did you fit the bushings in place? Did they float on the shaft or were they held in place with a set screw or some such thing.Comment
-
Success�. I think.
The hydraulic cylinder came apart with ease. Much easier than the rams on my old case back hoe. I think one of them was torqued to 1600 lbs.
The piston was held in place with a nut. There was a threaded portion that stuck out past this nut and was the stop for one end of the ram. I made a longer nut, chucked it in my drill press on a 1/2" screw and surfaced the face that would contact the end of the cylinder. This new nut was loctitened in place. The loctite should prevent the hydraulic fluid from traveling down the threads and jacking the nut off the shaft.
What works in theory sometimes works in practice.
Bruce.
Stroke is now 7.5". Which is in the ballpark of what is needed.Comment
-
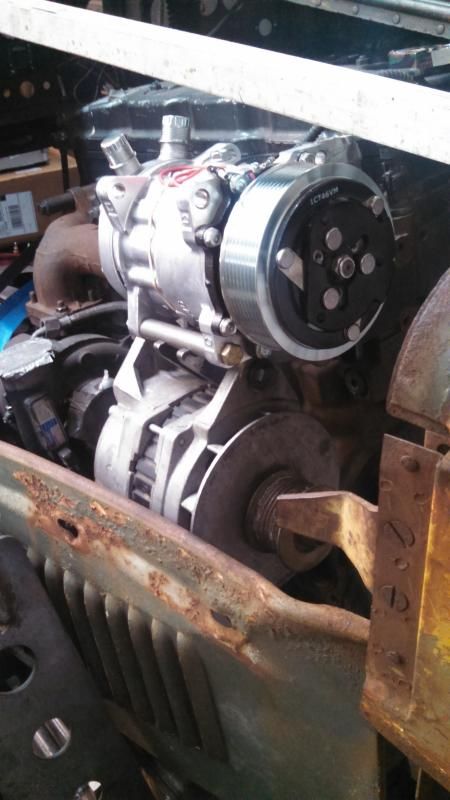
AC / Alt bracket combo... tight fit but it works!
 1942 WC53 Carryall in progress.
Comment
-
hydro boost works and does not work
My rebuilt box does not leak, but the same problem with slow brake pedal return continues. Also the vehicle does quite a bounce when the ram hits the end of its travel . The ram is set up to stop .013 before the axle stops make contact. I am not seeing any air in the steering fluid. I did cycle the steering over 20 times without the engine running. My saginaw steering box is not at the end of its travel because of steering pitman arm length. I will try and dig up a shorter pitman arm and see what this does to the "bump" issue with the ram.
Not sure what the issue is with the slow pedal return. A restriction in the return line would do it, but the return line has a boss fitting on it that has a bigger diameter than stock. The hydro boost is flipped upside down but I see lots of units set up in this manner. So this is the second hydro boost that has slow return on the brake pedal. The return line from the hydro boost connects to the reservoir but is only an inch lower at the reservoir end.
It would be nice to have a few of these issues go away. both the steering and brakes are critical parts of the system and both have issues.
Buce
I did set the tow in today. Dana spec at 1/16"
edit : that bracket is looking bee you tea fullComment
-
A great big MERRY CHRISTMAS to all of you
I stated earlier "My hydro boost does not work" so instead of getting fixated I have done a couple of other things.
The front axle toe in is now adjusted to 1/16 per the dana 60 specs.
Dropped the drag link and checked the throw on the steering box. The box has about 1/3 rotation more at each end than when the drag link is attached. I am not sure what the advantage would be for steering besides it would take less driver energy to turn the wheel.
Next thing to check and adjust will be the front caster.
Jumping to the rear there is some sort of 55 watt fog lights that will be doing duty as back up lights. The lights will work via a switch or by shifting the trany to reverse.
Also ran a bundle of wires for the trailer plug and whatever else needs electrical juice at the rear of the truck. the wiring is from an elevator, pretty sure it is about as good as you can get.
The trailer plug will exit out the end of the bumper next to the trailer hitch.
Take care this holiday and have a good time with your family and friends.
2015 is the year some of us will take our first ride in a Carryall.
Best wishes to all
keep your updates and pictures coming.
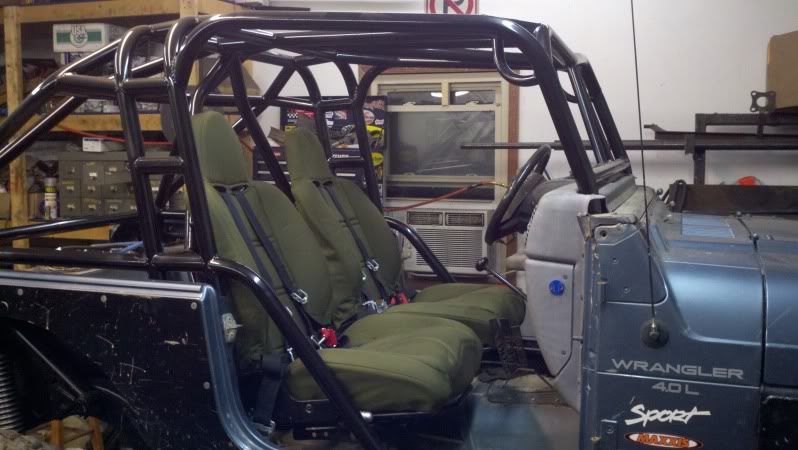
edit someone has a very nice looking cage on their jeepComment
-
Trying to track down an original round style radiator cap. I'd really like to keep the original cap location. I'm half way through building my own radiator so once I get it mounted I can locate my filler neck through the original opening. The hard part so far is the stupid pressure relief for the cap blow off... the fitting is in a bad spot on my filler neck, but if the original cap locking is weird, I'll be machining a new filler neck anyways.
Where is a good source for the original round style but pressure rated caps? I need like a 14 psi for this engine I believe.1942 WC53 Carryall in progress.Comment
Comment